Git, VSCode and Contributing to the Linux Lemming
Posted on Thursday, Mar 11, 2021
Transcript
Hello, and welcome to another edition of the Linux Lemming. I am your host, Rostek Halivera, and I want to start this episode by saying a very special thanks to Matt Stratton for his hard work on the Castanet theme, which really drives this site. Also to Ryan Walter of the Destination Linux, he created a very awesome video on using GitLab to create a static website using Hugo, which really was a huge inspiration for me to get started with the whole thing, and also just the Destination Linux crew for their weekly spotlight on Git, which again really motivated me and kind of reinvigorated myself to look back at Ryan’s video and actually make a web page. Any of the original documentation for this idea of an open podcast and things like that, and also building a simple website using Hugo and Git, lives on my original post in the Destination Linux forums, which is linked in the show notes. A detailed blog post will be forthcoming about how to actually go through and contribute to the project, and that will be a legitimate how to, but basically what I did to show how you can contribute to the Linux Lemming is to create a new user on my computer. I set up Git as that new user. I had to fork the Linux Lemming repo, and there is a big difference that I wasn’t quite aware of, but it kind of confirmed my suspicions between a clone and a fork, especially if you’re not like an approved contributor to a project. Forking is the way that you want to go, and then you merge those changes into the master branch once they’re approved. So I’ll go through how to do that, making these changes using VS Code, and then how to submit a merge request, which at this point in time can’t be done that I’m aware of in VS Code directly to GitLab. That feature is available in GitHub, but it’s lacking right now in terms of GitLab. So when I created a new user on my machine, I had to reestablish Git as that user. So I used the command git config tack tack global, and then you put in like your username. So it’d be user dot name, and then what you want that name to be. So I chose to just do the Linux Lemming. And then you also have to do git config tack tack global user dot email and put in an email for that as well, which I did. So once all of the Git stuff has been configured, then it’s time to go ahead and fork the project. And you have to do this through the web GUI. I’m sure you can do it on the command line and whatnot, but it’s just easier for somebody who doesn’t really know what they’re doing to just go ahead and use the GUI. So you’d have to go to the project homepage, and then right up at the top, where it says the title of the project. So Linux Lemming off to the right hand side, there’s a little bell the star and then it says fork. And right next to the word fork, it says how many forks of the project currently exist. And so right now there are two. And when I click on that number two, I can see Matt Stratton head forked it to add canify URLs to it. And also the other one from Roche, which was adding to a resource, which is how you could contribute in the future. If you have a really good resource that you want to link up in there, that’s how you would do it. So when you create a fork, it’s going to fork it into your own Git lab, user space, and then you can go ahead and clone it down to your local machine and work on it in VS code there. And once you have your clone in VS code, you can make any changes that you want. You can push those changes up to your Git lab repo. And then when you’re ready to go ahead and merge it into the master branch to have it officially become part of the project over on the left hand side of the main project, it says merge requests. It kind of goes down project overview, details, repository issues, merge requests. And when you click on that, there is an option off on the right hand side top of the page green button that says new merge request. And you would go ahead and click on that. And then it kind of shows you, you know, where is it coming from and where is it going. So in your source branch, you would pick your fork of the Linux lemming. And then if you had different branches off of there, if you clone it from mine, there’s currently a dev and a master. And as things kind of get teased out, maybe there will be a specific one that you have to merge to first, I haven’t quite decided. But you go ahead and put in master there. Then the target branch would be the Rasta Calavera Linux Lemming master branch there. And then you just kind of walk through the steps, put in any commit notes, kind of what you did or whatever. And then if it all looks good, it gets merged into the project and becomes part of the overall project. So to kind of wrap things up for this episode, I did all of this stuff in VS code. And I’ve never looked at any documentation on VS code. I just kind of hopped into the project after hearing other people talk about it. And turned out I really liked it as an editor. So I took a look at the documentation because it’s being talked about for this specific project. And my first impressions are that the documentation is very well done and approachable. I really appreciate the level of organization that it has and the inclusion of hyperlinks to other relevant material. For example, I really, really, really like the disclaimer of the prior knowledge that’s required to make good use of the documentation before you jump in. And if you don’t have that prior document or that prior knowledge, they have hyperlinks in there to show you what you need to do first for this documentation to be valuable. And I think that’s something that a lot of projects need to include kind of like a disclaimer for what level of comfort should you have before you attempt to try this thing that you want to do. So I’m still getting used to VS code and will most likely kind of add more to this in terms of like blog posts. But first impression is that VS code documentation gets a solid 10 out of 10. And with that, we’ll close out episode one of the Linux Lemming.Show Notes
Special Thanks
Matt Stratton for his hard work on the castanet theme which drives this site and to rwaltr for his awesome video on using Gitlab to create a website using Hugo. Also, the DLN Crew for their weekly spotlight on Git which motivated me.
Original Documentation
Written documentation for getting started with building a simple blog lives here
How to Contribute to the Linux Lemming
A detailed blog post will be made for this but in this episode I go over how to:
- setup git as a new user
- FORK the linuxlemming repo (difference between clone and fork) 1
- make changes in VSCode
- submit a Merge Request
VSCode Documentation
I never looked at any documentation for VSCode until I started the process for this episode. It seems that the documentation is very well done and approachable. I really like its level of organization and the inclusion of hyperlinks to other relevant material.
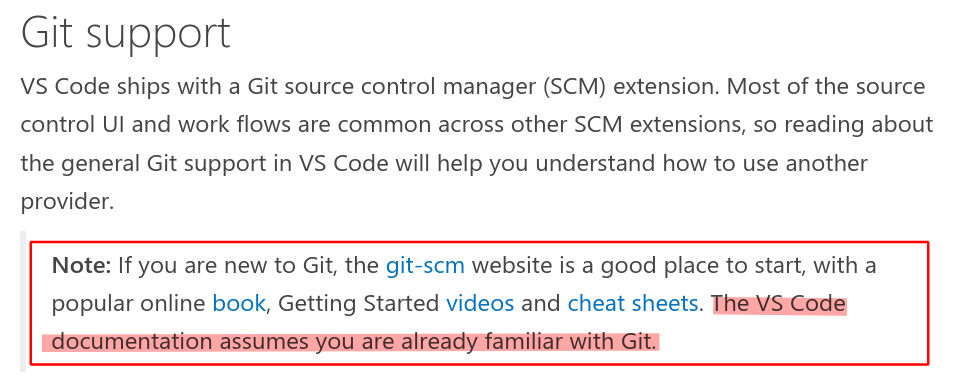
I REALLY like the disclaimer of prior knowledge required to make good use of the documentation and how to gain the required knowledge if you don’t meet that criteria.
I am still getting used to VSCode and will most likely do a blog post on it in the future but my first impression is that VSCode documentation gets a 10/10.